Paintings, drawings, thoughts and moans!!! The artist's journey. Website: www.angusmcewan.com
Tuesday, July 11, 2006
How did you paint that?
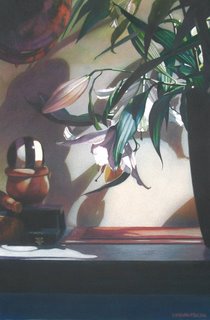
“Lily Shadows”
The still life was lit by one of a series of small spot lights I have wired to the roof of the studio- by playing around with the spots left and right I was able to come up with an interesting composition where objects dissolve and emerge from the shadows.
Shadows and lighting are extremely important to me and I spent a great deal of time with the lighting getting exactly the right sort of conditions to produce an interesting picture.
The colour philosophy for this picture was to create a particular orange/green balance around the painting with the blacks (produced by mixing Prussian blue and sepia) acting as anchors, punctuation and full stops. The light flickers through the leaves with a gentle warm glow.
I begin each picture with a clear idea about composition and then set about creating a fairly precise pencil drawing using a 2B-4B, being careful not to press too heavily on to the paper. Once I have the drawing done (sometimes that can take a couple of days in itself), I begin with the palest washes, often limiting the colour to a very small range and working with pure colour (unmixed).The only colour I mix constantly would be my black (blue & brown).
I proceed to build the picture through layers of pure colour anticipating results (laying blue over yellow –green), effectively mixing on to the paper with a series of glazed layers.
I work with the colours watered down to begin with and proceed to thicken the mix as the painting progresses. I make sure once a layer goes down, never to go over it again until its dry (even if I make a mistake) as this will result in a bare patch forming (the more you agitate the surface the more you lift out not put on)
I am constantly assessing what the picture needs and I never get into being too specific too quickly. Let all areas progress at the same time (I change this axiom when I am doing a complex painting involving different techniques in different areas, -i.e., texture in one part, smooth wash in another). I may introduce colour pencil at some stage if I feel it is needed and not every picture needs it. In this instance it helped with adding slight orange to shadows and producing smooth transitions from one part of the wall (top) to another. It is sometimes useful if you have overstepped the tone of a particular part to work back over with a slightly paler pencil. I then proceed to eventually work into areas with detail, tidying up edges, picking out highlights with Chinese white (not a purist I’m afraid) and viewing the picture from a distance to see if it is reading as a whole and not as a jumble of parts with equal focal points jousting for attention.
The picture has a lot of different techniques working together as a unit – I don’t like it to be very obvious how each part was created. If I become too aware of a particular technique then it has been “over cooked”. There are a lot of flat washes and a number of wet on wet areas – particularly at the start. Once I have achieved what I need from the wet on wet (the back wall was originally created this way) I then prefer to work wet on dry. I always try to reserve my whites by using masking fluid and the ball and certain parts of the flowers were kept this way. I will use Chinese white if I need to but find that it can be quite cold compared to the white of the paper. There is a little bit of spraying with an airbrush to soften the shadows- again I use this tool in certain circumstances and not in every picture.
My motto is use whatever works as long as it is conservation friendly, i.e. I don’t want bits falling off the picture next week!
The main challenge with this picture was to get the punchy quality produced from the shadows without the shadows becoming an overwhelming part of the picture – I needed them (shadows) to sit quietly in the background, not competing with the main object of focus (flowers).
How did you paint that? 100 ways to paint still life and florals.
ISBN 1-929834-39-X
Published by International artist
Subscribe to:
Post Comments (Atom)

1 comment:
Really enjoyed your explanation of your techniques and use of different media in producing this painting.
Post a Comment